
Lime Pointing Tips
As I near the end of my repointing opus magnum I feel a little more qualified to advise on pointing with lime mortar
than on most of the subjects I blather on about on this blog.
So here’s my take on all things lime mortar related – others may have differing guidelines – this is very much my take. This post is this first part of a series of 3 or 4 (I’ll see how I get on).
Firstly, I’ll cover the tools of the (pointing) trade.
Tools
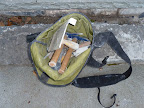
You need some pretty specialist tools for pointing. Nothing too exotic or hard to find, but I think it’s important to get the correct tools – tools that have the right size, weight and balance for the job. As a generally
For damping down the wall before pointing, you’ll need a good bristled brush and a bucket of water. I favour the ‘flick’ technique – water – bucket – dip brush and flick! Some people advocate the use of a garden water spray but that seems a little too fiddly to me.
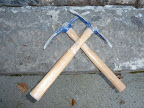
You’ll need a good hand pick or preferably two to allow for spreading them around your work area and keeping at least one close to hand. Use the pick for hacking out the old mortar to give a repointable joint. The pick will soon blunt and so a tool for resharpening is also recommended.
There are various machinery based options involving drill attachments and angle grinders that can be used for cleaning out old pointing joints, but I avoid them for fear of damaging the stonework.
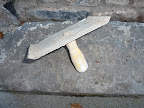
To hold the mortar whilst pointing you need a hawk. Small pointing hawks rather than larger plasterers hawks are quite hard to come by, try your lime supplier first as they tend to stock them. A small hawk, by that I mean one that can accommodate a good trowel full of mortar and not much more is pretty essential when it comes to slow, delicate repointing work. Too large a hawk with too much mortar on it becomes surprising heavy surprisingly quickly.
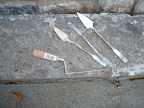
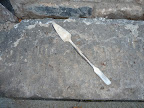
I use two different size trowels, a normal sized pointing trowel for initially applying mortar to the joints and a smaller ‘trowel and square tool’ for finishing off – smoothing down the fresh mortar, cleaning off excess and filling small gaps. If you have straight mortar joints or need to work mortar into narrow recesses then a finger trowel may be of use, although mine is rarely used. I must admit to probably over-using the small trowel and encourage you not to do the same. I’m sure I could have worked much more quickly if I’d used a proper sized trowel whenever I could have. I’m trying to remedy that now by working with the larger trowel whenever possible, but I soon lapse back to my old ways if I’m not careful.
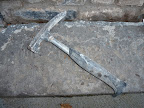
You’ll also need a masonary or brick hammer for hammering pinning stones into the original mortar bed to achieve a firm bedding before pointing (there’ll be more on what I mean by this in the technique section).
You’ll also need a wire brush or two (I always favour doubling up on tools that you’re not using all the time – with two around it’s more likely that at least one will be at hand). A hard bristled brush is also handy for cleaning off old lose mortar and misplaced or untidy dried new mortar. Do be careful when using a wire brush and try to keep it away from your nicely pointed joints as it will easily damage them.
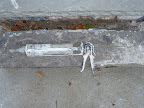
I bought a mortar gun way back when I first started pointing. At the time I couldn’t get on with it at all. I’d try using it and usually give up in disgust at the amount of time I was wasting filling it, clogging it up, emptying it and repeating the whole cycle whilst achieving very little in the way of pointing. However, after much trial and error I came to a happy compromise with it and learnt when to try using it and when not to bother. The key is getting the mortar to the correct consistency (much sloppier than you’d mix for normal pointing) and like a good gravy ensure there are no lumps (of stone or lime) in it. Too firm a mix will clog the gun and you’ll end up pressing water out of the mortar rather than mortar out of the gun. Any lumps of stone or lime putty will block the nozzle of the gun and nothing will come out. As you’ll be using a sloppy and smooth mortar mix it’s only really suitable for filling deep or inaccessible holes in the mortar and in relatively dry conditions that will allow the mortar to lose a lot of moisture relatively quickly – I tend to not damp the wall down prior to using this mortar. In practice I only use the gun when I have deep and / or inaccessible joints to repoint. The gun does the bulk working, pumping quantities of mortar into the joints first, I then finish the top layer of pointing in the normal way by hand.
Leave a Reply