My first proper foray into DIY carpentry at the barn has been constructing a shelving unit to sit under the stairs. The shelves are required to provide storage, box in the under-stairs area and muffle the sound from the under-floor heating pumps.
The timber I chose was basic off-the-shelf stuff from B&Q – planed smoothed softwood boards. My original intention was to paint or stain the wood so the appearance of the untreated wood wasn’t of great importance. However, once finished I’m relatively happy with the finish of the wood and the gentle contrast between the whitened oak of the stairs and the clean pine boards of the shelves so untreated they will remain.
I toyed with the idea of attempting fancy joints, inspired by sites such as The Joiners Apprentice beautiful hand-cut dovetails tempted me. But fear of my abilities held me back and instead I decided upon using simple dowelled butt joints for the corners and dado dowel joints for the shelves. I’ll save fancy joints for a future project. I’ve put together this Sketchup model to demonstrate my shelf joints.
You can download this model from my Sketchup library – Dado dowel joint model.
The space the shelving unit needed to fit is pretty standard and similar spaces are found in most homes with traditional staircases. The forty five degree slope of the stairs almost forms a triangle, the exception being the vertical edge of the bottom step. Geometrically in 2D the shelf unit, viewed from the front or back is a quadrilateral trapezium.
The under-the-stairs area had become a pretty handy dumping group for tools, left over materials and my sons toys so a general clearout was in order prior to commencing work.
 |
| From Barn Conversion 2011 |
 |
| From Barn Conversion 2011 |
I started by cutting the four ‘sides’ for the ‘outer’ structure and then the three shelves. The side pieces were cut to exact measurements and the shelves cut longer than necessary to allow for trimming to the correct length later. The two vertical ‘side walls’ have bevelled tops, cut at 45 degrees on which the sloping top sits. Similarly, the shelves have one perpendicular end and one bevelled end, the bevelled end meeting the sloping top of the shelving unit. I did all this cutting with a combination of my circular saw and a borrowed table saw that is stuck at 45 degrees!
I then used my router to cut the three dado joints into tallest side wall. I had a cutter that was almost wide enough to allow me to cut the full width of each dado in a single pass. I clamped wooden guides in place, cut the dado then widened slightly with a hand-saw, then used a small chisel and sand paper to tidy up. One of the dados ended up deeper than intended as the guide for the router depth had worked lose so a little remedial filling with a sliver of wood was necessary.
I then drilled and glued the dowels in place – two per joint. The trickiest joints were those holding the sloping top in place. I eventually settled on drilling straight through both pieces of wood from the top straight down into the upright rather than drilling one side of the joint then marrying it up with the other side and drilling the ‘recieving’ hole.
 |
| From Barn Conversion 2011 |
The final job was to fix the back panels for which I used some external plywood I had left over from boxing in the eaves. The ply had a surprisingly pleasing finish to it so it has remained untreated like the rest of the wood-work. I had already spaced the shelves in such a way that they would cover the joints between the panels, so I simply tacked the back panels into place.
I also built a small rectangular insulation lined box to cover the heating manifold and pumps which I slipped into place before positioning the shelves. The main job of this was to muffle the sound made by the under-floor heating paraphernalia when it was in operation, a job in which it has pretty much failed and that I’ll need to address again at a later date.
 |
| From Barn Conversion 2011 |
From there it all came together – some liberal filling and sanding helped me to paper over the cracks of my inexperienced cutting.
Despite having planned to make the shelves a centimetre or so narrower and shorter than the gap they were to fit in, my measuring went awry somewhere along the line and they turned out to be a very snug fit. Some gentle bashing and a couple of wedges was all that as needed to fix the shelves into place.
Overall I’m pretty pleased with the results.
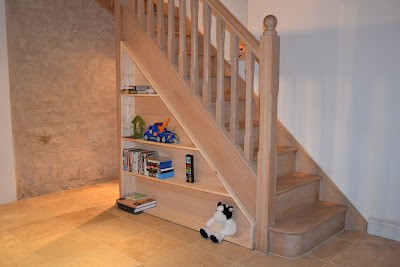 |
| From Barn Conversion 2011 |
I’ve prepared Sketchup model of the shelves that you might like to take a look at….
You can download this model from my Sketchup library – Under stairs shelving unit model.
Leave a Reply