Given the problems I’d had with the signal from the TV aerial I thought I’d look into satellite TV. There was no way I was going to pay and any escape from the clutches of Sky seemed to be liberating. With the promise of more HD channels than Freeview, Freesat looked to be the way to go.
(As it transpired, the problems I was having with the digital signal from the roof mounted TV aerial (the signal dropped intermittently and TV screen went blank momentarily) were more to do with the TV I was using than the signal and the allure of more HD channels on Freesat doesn’t stand true any longer after the introduction of Freeview HD last year – but you live and learn.)
So with a dish, cabling, a Freesat receiver, a satellite finder and a compass I set about looking for satellites…
I’ll not go into too many details about getting the dish up on a wall as it’s pretty straight-forward. I will give one word of warning – make sure that you get the moveable hinge on the bracket that you fix the dish to the wall with correctly aligned so that you’ll be able to move the dish horizontally from east to west rather than up and down as I did first time!
You’ll need to run cables to the dish from your receiver. For Freesat with a receiver with two tuners you’ll want to run two cables so that you can watch one channel and record another or record from two channels simultaneously. Buy good quality cable – I used PF100 Coaxial Satellite Cable bought in a 100 metre long roll.
 |
| From Barn Conversion 2011 |
My cable run is quite long (over 25 metres) and I was worried about loss / degradation of signal. However, having experimented, the key to maintaining a good signal seems to be maintaining uncut runs of cable. I’ve had more problems getting a strong, uninterrupted signal through cables that have joins along their length than from long cables. So try and run complete, uncut lengths of cable, rather than patching together bits and pieces.
You’ll need f-type plugs for connecting the cable to the receiver at one end and the LNB at the other. Buy them by the pack from a DIY or tool retailer rather than individually from an electrical store as you’ll tend to get more for your money. I recommend outdoor compression f-type connectors for connecting the cable to the LNB.
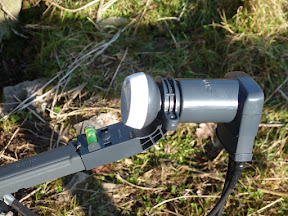
Let’s start to align the dish. Firstly, make sure the receiver is switched off…
 |
| From Barn Conversion 2011 |
With the dish wall mounted but still lose, we first need to get the skew on the LNB set correctly. This is a pretty dull subject and most dishes will have a leaflet with a map that will tell you how to set your particular LNB correctly for your location, so please refer to that.
Next we’ll get the dish aligned vertically. With a spirit level held vertically across the face of the dish get it level. Tighten the appropriate nuts and bolts on your bracket to retain the level …easy hey?!
We then move on to the more tricky horizonal alignment.
Luckily, I’m able to get a clear view of the sky from field to the side of the barn, so I’ve no issues about a blocked line of sight to the Freesat satellites. The satellites we need orbit over Africa and can be found in the south-east of the sky. We’ll be looking for the Astra group of satellites at 28.2º east for TV channels and the Eurobird satellite at 28.5º east from which the electronic programme guide (EPG) is transmitted.
The easiest way to find the satellites is with a satellite finder. This is a small gadget with a dial on it that also gives an audible indication of the satellite signal strength from the current bearing of your dish. Make sure you’ve switched your receiver off. Attach a short length of cable to the ‘To LNB’ (or equivalent) f-type socket of the finder then connect this to the LNB. Connect the cable from your reciever to the ‘To receiver’ (or equivalent) socket of the finder.
Switch your reciever on – this will power the satellite finder and you can start hunting satellites.
I found it easiest to start with the dish pointed east (many online guides suggest start from the south but the sky seems more cluttered with satellites when coming from that direction).
Move the dish slowly from the east, southwards aligning the dish with the first strong signal you can find as you move toward the south. Lock the dish onto the signal by tightening the approriate nuts and bolts.
Now check your reciever. Most boxes have some method of checking signal strength (for example, on a Humax FOXSAT-HDR the select Menu > System > Diagnostics) so go to the appropriate page on your system and check signal strength. If signal strength is low then tweak the positioning of the dish. As long as you’ve found the correct satellites you should only need to make very small adjustments so be careful.
Once happy with the signal then remove the satellite finder, connect both cables to the LNB and recheck signal strengths. In a dual tuner system, if there’s a problem with the signal to one tuner and not the other your issue is probably with the cable or connections so recheck all the connections before moving the dish.
Once happy with the signal then make sure that your dish is bolted firmly in place.
With a long cable run you may want to use an in-line LNB satellite signal booster on each cable. They are best installed close to the dish where there is more of a signal to boost. In my case, I’ve placed them just over half-way along my cable run – after the cables enter the house where they are patched into the cabling that runs to the wall sockets. They seem to have boosted my signal significantly.
Leave a Reply